There’s a quiet beauty in watching the stars move. Over minutes and hours, they trace slow arcs across the sky – a reflection of the Earth turning beneath us. With a camera and a bit of patience, you can record that movement in a single frame. The result is a star trail image: elegant, hypnotic, and surprisingly beginner-friendly.
This guide will walk you through how to photograph star trails, from equipment and setup to capturing and combining the images. It’s a project you can try from a dark sky site, a back garden, or even the edge of a town.
How Star Trails Work
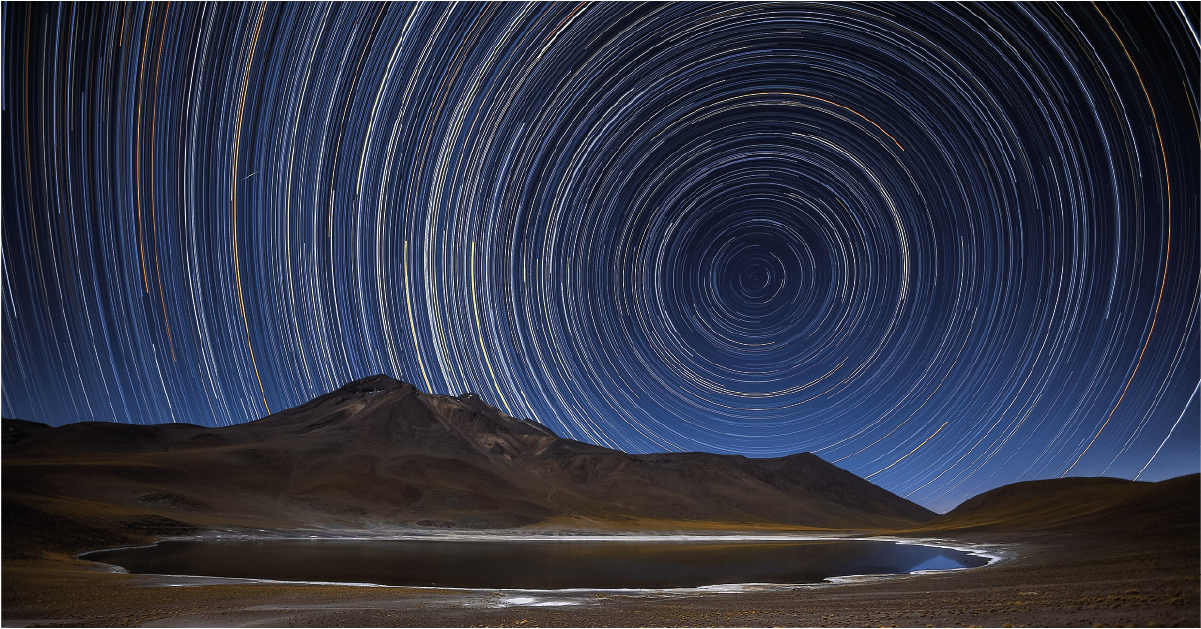
Star trails are made by taking a long sequence of photos – usually hundreds of short exposures – and stacking them together. As the Earth rotates, stars appear to move through the frame, creating trails. The longer you shoot, the longer the trails become.
If you point your camera near the North Star (Polaris), the stars will form circular patterns. Pointing east or west creates curved arcs across the sky. Pointing south shows the stars as sweeping upward trails. Each direction tells a different story.
What You Need
You don’t need advanced gear to start capturing star trails. In fact, many people begin with what they already have:
- Camera – A DSLR or mirrorless camera that supports manual exposure settings.
- Lens – A wide-angle lens (between 14 mm and 35 mm) gives you more sky to work with.
- Tripod – A sturdy tripod is essential to keep your framing stable over time.
- Remote shutter release or intervalometer – To automate taking dozens or hundreds of exposures without touching the camera.
- Spare batteries or external power – Long sequences use a lot of power. A power bank or grip battery is helpful.
- Clear skies and a bit of time – That’s all you need to begin.
No tracking mount is required – in fact, you don’t want one for this style of image. The movement is the point.
Set Your Composition
Scout your location during the day or with a torch at dusk. A foreground element – like a tree, building, or rock formation – helps anchor the image and give it a sense of place. Look for clean shapes and try to avoid stray light sources or clutter.
Aim your camera based on the kind of trail pattern you want:
- North (in the UK): Circles around Polaris.
- East/West: Diagonal or arcing lines across the frame.
- South: Sweeping arcs rising up from the horizon.
Level your tripod, frame the scene, and lock it down securely.
Camera Settings For Star Trails
You’ll be taking lots of short exposures, typically between 20 and 30 seconds each. Here’s a good place to start:
- Exposure time: 25 seconds.
- Aperture: As wide as your lens allows (e.g. f/2.8 or f/4).
- ISO: Start around ISO 800 and adjust based on your sky brightness.
Set your white balance to a fixed value (like 4000K) to avoid colour shifts between frames. Turn off long exposure noise reduction – it doubles the time between shots.
Use manual focus to focus on a bright star or distant light. Take a few test exposures to check sharpness before starting your sequence.
How Long Should You Shoot?
The longer you shoot, the longer your trails. A good starting point is:
- 1–2 hours for short arcs.
- 3–4 hours for fuller, dramatic trails.
Even 30 minutes will show motion – but longer sequences are more striking.
Use an intervalometer or in-camera timelapse mode to take continuous shots with minimal gap between them. You might end up with 100–500 frames or more.
Processing Your Star Trails
Once you’ve finished shooting, you’ll stack your frames using software to create the final image. The stacking process overlays the stars from each frame, building up the trails.
Popular options include:
- StarStaX – A free, beginner-friendly tool for stacking star trails quickly.
- Sequator (Windows only) – Primarily for deep sky, but can stack star trails as well.
- Photoshop – You can load your images as layers and blend them manually using Lighten mode.
You can also blend your final trail stack with a single clean frame to preserve a sharp foreground. This is especially useful if your scene includes buildings, trees, or people.
Managing Gaps And Glitches
Sometimes gaps appear in your trails – from missed exposures, plane lights, or clouds. You can:
- Use gap-filling tools in StarStaX.
- Clone or patch gaps manually in Photoshop.
- Embrace them as part of the aesthetic – especially with thinner, fainter trails.
Practice helps. Each run teaches you something – about your camera, your sky, and your patience.
Final Thoughts: A Time-Lapse In One Frame
Star trail photography is one of the most accessible forms of night sky imaging. It doesn’t need tracking or guiding or specialised sensors – just a camera, a tripod, and time.
And what you get in return is more than just a pattern of lines. It’s a picture of time itself – the quiet turn of the Earth, recorded in arcs and curves of starlight.
It’s a good place to begin, and a calming thing to return to. The stars keep moving. You just need to let them.